grey & gold

G&Ggw1

Every year I participate in Goody Goody Gift Swap, an online gift swap for ~creatives. I like to make as many of the things included in each year’s package as I can myself, right down to the gift wrap. This year I designed some grey & gold watercolour wrapping paper and matching greeting card and I liked how they turned out so much I decided to share them with you all as a free download.

This set includes the card as well as two sheets of wrapping paper in light and dark grey. They are all US Letter size (8.5″ x 11″) and are meant to be printed borderless at 100%. Obviously this gift wrap is only suitable for small gifts BUT if you have access to a large-format printer (I don’t, wahh) you could print it larger.

The card is designed for use with 5.25″ x 7.25″-size envelopes, which you can find at office supply or craft stores (I get mine at Michael’s, with a 50% off coupon they are about $7 for 50), or you can find free templates to make envelopes that size online if you’re so inclined. You could also print the card at a smaller size to use with smaller envelopes. Once the card is printed simply trim the edges at the line and fold in half.

G&Ggw2

Download the full set here. Free for personal use only.

december

december 2015 canadian small

I’ve been really busy filling orders so I haven’t really had time to blog or do anything else creative, but I made this calendar page a while ago. FUNNY STORY THO: I made the November, December and January pages one right after the other back in October, and sometimes when I do a bunch of stuff at the same time like that I make dumb mistakes. Like yesterday, when I was working on orders all day and realized just as I was about to pack it for shipment I’d made a banner that read “Feminist Killojy.” ANYWAY my November calendar page had 31 days on it! I’ve had it up on my bulletin board all month and didn’t even realize there was a Tuesday, November 31st on it until I put up the December one and was like “wait… is it Wednesday today???” Luckily I save my calendars with all the separate layers so I was able to go back an rearrange the dates. Of course, I realize now this means I’ll have to rearrange the January page’s dates as well. What is my life???

Anyway, you can download the full size with the correct dates here; it’s available in three versions: Canadian (Christmas Eve/Day & Boxing Day), American (Christmas Eve/Day only) and Simple (no holidays). If you would like a different version please feel free to message me and I’ll put it together for you.

august

August Calendar (small)

Do you think I will ever remember to get my calendar page done before the 1st of the month? NOT LIKELY. I actually remembered that I needed to do it about fifty billion times during the last week, but never when I was at my computer. I’m feeling really sick and raggedy today tho, so it seemed the perfect opportunity to sit very still and just click things, haha.

Download the full size here.

lime & mint prosecco sangria

IMG_0115

IMG_0114

Since it’s been so hot lately all I want to do is drink cool, fizzy drinks with lots of ice. This prosecco sangria fits the bill admirably, with the refreshing lime and cooling mint flavours. It’s so easy to make and definitely easy to drink.

IMG_0107

ingredients
1 bottle of prosecco
1/3 cup mint simple syrup (instructions below)
juice of 1 lime
1 lime, sliced
10-12 mint leaves
ice

1. Make your mint simple syrup: in a small saucepan combine 1 cup water, 1 cup sugar and 1 cup mint leaves. Bring to a boil, stirring until all the sugar is dissolved. Remove from heat and allow to cool completely. Strain into a container with a lid. Keep refrigerated for up to a month.

2. Gently roll the mint leaves between your hands to release the oils.

3. In a jug combine the mint simple syrup, lime juice, lime slices and mint leaves.

4. Add the prosecco and stir. Add as much ice as will fit. Serve immediately.

IMG_0118

wild rose lemonade syrup

wildroselemonadesauce

I made this syrup using some of the leftover wild rose petal simple syrup from the sangria I made on the weekend. We put it on waffles but it could also be used in cocktails, served with cake or ice cream for dessert, and I’m super keen to try it in a sno-cone. The flavour is bright and floral without being too sweet, and steeping the rose petals for a day when you make the simple syrup imparts a beautiful pink hue.

wild rose lemonade syrup
2/3 cup lemonade
1/3 cup wild rose petal simple syrup
juice of one lemon
1-2 tbs corn starch
1-2 tbs cold water

Mix together the lemonade, wild rose petal simple syrup, and lemon juice in a small saucepan and bring to a boil. In a small bowl mix together the corn starch and cold water, stirring until smooth. Add the corn starch slurry to the boiling mixture in the saucepan, whisking until it begins to thicken. Remove the saucepan from from the heat and allow the syrup to cool. Serve immediately, or store in the fridge in an air-tight container for up to a week.

wildroselemonadesaucepour

I have terrible luck (read: I’m bad at cooking) with thickening syrups & sauces and tend to either under- or over-thicken them, so I like to add the cornstarch a small amount at a time to ensure I don’t end up with a total gloop (I believe that is the scientific term for over-thickened syrups), and don’t over boil it or your syrup will thin out again. Cornstarch isn’t GREAT for thickening acidic syrups like this, so you have to use a little extra, or if you have arrowroot or tapioca starch they are better for this job (I do not, which is why I used corn starch. Next time, though, I will try a different starch for this).

wildroselemonadesauceclose

corn & potato salad with bacon

03potatosalad

02potatosalad

I’ve never been a potato salad person. I never had it growing up (I think my mom hates mayonnaise or something so we didn’t have it in the house? I’m sure she’ll chime in the comments) and most super potato salad-y potato salads just look gross and sloppy to me. But I’ve been looking for side dishes to serve with my Friday sliders and I figured WHAT THE HECK LET’S TRY OUT A POTATO SALAD.

I tried to find recipes online and most had mustard or dill or other things I hate and don’t have in the house (I am my mother’s daughter) so I figured I’d just wing it. In the end what I came up with was delicious and I can see myself making many variations of this throughout the summer, even though I have rude and ungrateful children who both refused to eat it.

corn & potato salad with bacon

1 1/2 lbs baby potatoes
1/2 lb thick-cut bacon*
1 cup corn kernels
1/4 cup mayonnaise or Miracle Whip**
1-2 tbs minced fresh Italian parsley***
salt & pepper to taste

Wash the potatoes and cut them to bite-sized pieces. Add to a large pt of salted water and boil until they can be easily pierced with a fork but aren’t like, disintegrating. Allow to cool.

Cook your bacon until it is almost crispy. I like to add the bacon to a cold pan and slowly bring the heat up to medium low, turning the bacon often. Once it’s done cut/crumble it into small pieces.

Cook your corn. To my great shame I used frozen corn and just ran hot water over it to defrost it, but if you are fancy and not lazy you could use fresh corn, either boiled or roasted.

Combine all ingredients in a medium bowl and mix well. Refrigerate until serving.

01potatosalad

*I used bacon from Gelderman Farms that we picked up at the famer’s market. I TOTALLY recommend it!
**Miracle Whip is something we DID have in the house when I was a kid and I still prefer it to mayonnaise. You can use mayonnaise though, or sour cream or even plain yogurt. YOU DO YOU.
***I pretty much just added this for the visual effect of the green, but green onions or chives would have the same effect and prob add more to the flavour.

painting with kids

04paintinga

A few months ago I read a post on another blog about teaching kids about abstract art. I’m not going to link to it because I’m not that bitchy, but it was just about the dumbest thing I’ve ever read. The project was filled with rules and structure and admonishments to help your child not mix the paint together too much lest they make that “ugly brown colour” and the piece would no longer be suitable for display. The child wasn’t even allowed to put the paint on themselves, they had to pick a few colours which the parent then dripped onto the paper in limited quantities. What a way to teach a child about art, about creativity, about using their imagination to express themselves! It just seemed really… control freak-y, and less about a child creating and more about the mom having a piece of art (with no ugly brown) to display in her home. My technique for painting with kids is:

-get a kid
-give them paint

05paintingb
literally having so much fun

Like WHO CARES if they make a mess, if they scrub the paper so hard it gets holes, if they mix all the colours together and yes, end up with brown paint. Maybe they LIKE doing it that way, and if they aren’t happy with the result then they will learn to not do it that way next time. The other week Gwen and her little friend did some painting together, I just let them do what they wanted and what was most interesting was that at 2 1/2 they each had completely different techniques. Gwen globbed on loads of paint in bright colours, all over her paper. Her friend stuck to a few pastel colours, dabbing on small amounts and focussing the bulk of his brushwork to one section of the paper, with a few dots and lines on the rest of the page. They were each expressing themselves they way they chose to, and I think that the end results were so much better than some forced, weird, rules-based “abstract” art.

finishedpainting

Baby DIY: Scallop Trim Suede Moccasins

*This pattern is free for personal use ONLY! Please don’t use my pattern to make products to sell.

Untitled
I’ve been debating for a while whether or not to put up a DIY of this, because really, who other than me is crazy enough to hand-sew a pair of baby shoes (or multiple pairs…), but in the end I decided WHAT THE HECK since I was making a new pair anyway.

When I was first researching how to make my own baby shoes the biggest problem I had was that most of the instructions were for machine-sewed shoes (and my beanbag recovering debacle the other weekend proves I’m NOT READY for machine sewing) and the patterns I found were super complicated, with lining and separate elastic channel pieces and buttonholes and just no. I’ve made a few different patterns and this one is the simplest- it’s only three pieces per shoe!

This pattern is for making suede shoes only; it won’t work with leather since both sides of the fabric are visible. Suede shoes are suitable for babies of all ages- tiny ones who just lay there, crawlers and scootchers, and even walkers- the suede soles are less slippery than leather would be.
IMG_0360
A note about what suede to use: You’ll want to use a piece that looks the same on both sides since you’ll be folding the scalloped edge over. Mine was a little scruffy on the back in one area so I used that part for the soles since it wouldn’t show. You’ll also want to use a suede that is soft and flexible so it’s comfortable on baby’s feet, and thick enough that it’ll hold the shape and not get worn out but not so thick it’s impossible to sew. Mine is about 2mm or 3/32″ thick, and very soft.

You’ll need…

pattern PLEASE NOTE: Due to some people not understanding what “FREE FOR PERSONAL USE ONLY” means I have had to remove the pattern, please email me if you’d like a copy // cardstock // suede // 1/4″ elastic // heavy gauge & regular thread // small needle, leather needle and friggin’ huge needle // mini binder clips // pliers (optional)

My suede is a coral pink and I used cream thread and white elastic, because that’s what I had on hand, but you might want to use darker thread or black elastic for a darker colour of suede. You could match the thread to the suede or use a contrasting colour (ie orange thread on blue suede) to get the look you want for these shoes.

Measure the length of the sole of your baby’s foot.
IMG_0362
Add one-half inch to the length of your baby’s foot for the seam allowance. Then take that measurement (your child’s foot length + .5″), figure out what percentage it is of the pattern’s sole length (4.75″) and print the pattern at that percentage.. FOR EXAMPLE:

for a child with a larger foot:
a child has a foot 5″ long
5″ + .5″ = 5.5″
5.5 /4.75 = 1.16
1.16 x 100 = 116
print the pattern at 116%

for a child with a smaller foot:
a child has a foot 3″ long
3″ + .5″ = 3.5″
3.5 /4.75 = 0.74
0.74 x 100 = 74
print the pattern at 74%

This will scale all the pattern piece sizes up or down, not just the sole, but be aware that if you scale the pattern up too large you’ll end up with a bag-like shoe. The largest size I’ve made is a toddler 8 and I wouldn’t go above a toddler 10 (a 6.5″ foot).

You’ll want to make the shoes a little big so your baby can grow into them, otherwise you’re doing a lot of work for something she/he will only fit into for a week.

Print the pattern on cardstock at the percentage determined above and cut out the pieces. Printed at 100% on US Letter Borderless (the borderless is very important here!!) the pattern has a sole 4 3/4″ long. This is the size I used for Gwen’s tan shoes, which at 9 months she’s almost outgrown, so I printed the pattern at 105%.
Screen Shot 2013-08-10 at 1.35.45 PM
This increased the sole length to 5 1/4″, only half an inch longer, but as you can see, this small increase made a HUGE difference!
Untitled

Trace the pattern pieces onto the back of the suede and cut out. You need to trace two of each of the three pieces.
Untitled
Make sure to flip the pattern for the sole over to trace the second one as it’s not symmetrical; there will be a distinct left and right sole. When cutting the scallops, trim INSIDE the line you’ve traced so no marks will show once they are folded over.
Untitled

Fold over the scalloped edge on the heel and vamp pieces at the fold line and clip down with binder clips.
Untitled
Using heavy-gauge thread and a leather needle, stitch straight across the scallops 1/4″ down from the fold, and then stitch back across the opposite way. This will form the channel for the elastic.
Untitled

Next, you need to clip your heels and vamps to the soles.
Untitled
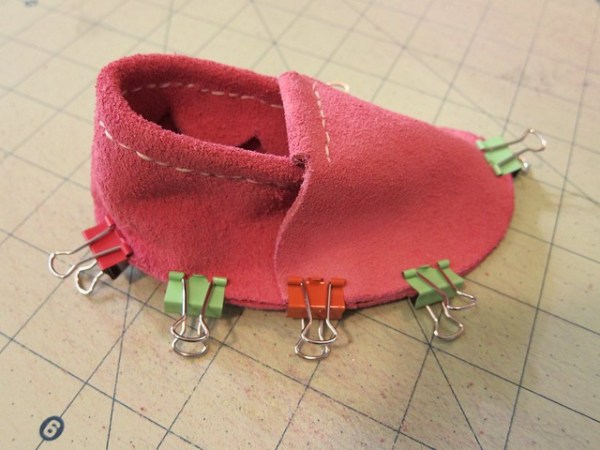
It will take a little adjusting to place them correctly, you want the ends of the vamp and heel pieces to line up evenly on either side of the sole. Clip them right sides facing, with the vamp on the outside of the heel.
Untitled
The vamp and heel pieces will overlap, so try to make sure they overlap the same amount on both sides.

Leaving a 1/8″ seam allowance at the edge, sew your heel and vamp pieces to the soles. Sew all the way around the sole twice. I usually start on the side where the heel and vamp pieces overlap because sewing through 3 layers of suede is the worst and I like to get it over with.
Untitled
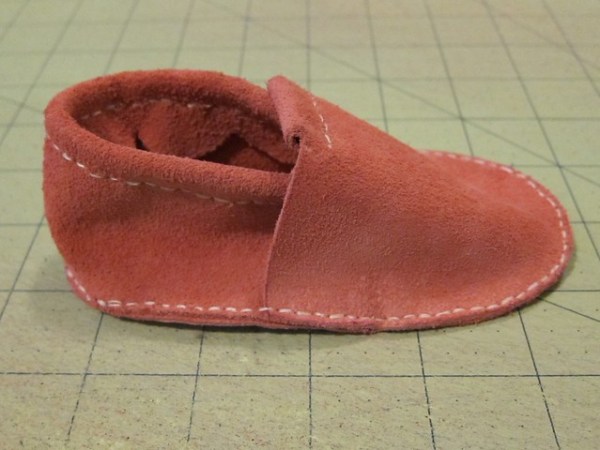
Once you’ve sewn both shoes, turn them right side out.
Untitled

Thread the friggin’ huge needle with the elastic.
Untitled
I think this one is meant for like… sackcloth or something? idk, you just want a needle that is thick, blunt and with an eye large enough for the elastic. Feed the needle through the channel on the heel piece.
Untitled
Use the pliers if you have trouble getting it through. Once it’s through the heel channel, feed it through the vamp channel.
Untitled

Using the regular needle and a matching thread, sew the ends of the elastic together.
Untitled
You need to make sure it’s tight enough to keep the shoe on baby’s foot, but not so tight that you can’t even get it on in the first place. This is actually the part I have the most trouble with! I’ve tried measuring the ankle circumference and using specific lengths of elastic but it never works out for me, so I just try to ~guesstimate how big I need it to be. If your elastic is too loose or tight just cut it out and try again! Once you’ve got them sewn at the right tightness, pull the elastic through the channel so the seam is inside.

Untitled
That’s it! You’re done! Good job! If you’ve sewn them well these shoes will last longer than your baby will fit into them. If anyone actually uses this I would be THRILLED to see your finished shoes so please leave me a comment with a pic or a link, tweet/instagram me with the hashtag #unicornparade, email me or post a pic on the facebook page.

*This pattern is free for personal use ONLY! Please don’t use my pattern to make products to sell.

If you would like me to make a pair of these (or another style of baby/toddler shoe) for you, please check out my Kickstarter campaign!